It’s show time, folks!
How about, get your Magento 2 setup to next level with Docker and SASS?
Well, I can hear some rumbling noises here and there already. Well, out of all other related factors, there might be two major ones we should consider here. For many of us, this will be a TLDR version and this how-to is based on Mac OS X.
-
Why docker? Why not Vagrant or just MAMP?
Vagrant a brief insight
Like many of you, I am still using vagrant. This is a tool which makes running virtual machines easier. The important part here to remember, vagrant is a wrapper-like interface which wraps around existing virtualisation technologies. This virtualisation part is handled by other apps i.e. VirtualBox. All vagrant does is, it wraps an environment around those apps and enables us to share environments.
Running virtual machines has always been proven an expensive and resource-hungry technology. When a virtual machine starts on a host machine (MacBook, laptop), it needs to have sufficient CPU and RAM, all borrowed from the host machine, to run at its full capacity. So, naturally, host machine needs to have more CPU and RAM to be able to run any virtual machines. And hence performance issues can be experienced on host machines where less RAM and CPU cores available. Amongst other negatives are -- virtual machines are slow to boot up, portability among other host machines is not perfect.
Docker a brief insight
As we more or less suffered from the limitations of virtual machines, developer communities put all their efforts to find an alternative solution. And the final outcome is the containers. For instance, Google hugely contributed to bring container technologies to Linux kernel. The idea and implementation of containers have been around UNIX community since its early age. If any of you managed/worked/hacked Linux servers with multiple users and their privileges, the command chroot might be very familiar to you. And the implementation of chroot is somewhat closer to container.
Containers do not start a new machine inside of a host machine. Instead, they utilise chunk of processes form the host machine to allow them to perform their tasks. The end result is, no more extra load on memory and CPU on host machine. Moving containers is also great from local machine to staging/live servers or other local machines. In other words -- containers brought 100% portability among different host machines. The containers which I created on my local machine and made available on GitHub for this Magento 2 project, these will work the same in all your local machines. Given that your Magento 2 installation is working. Magento 2 code base is the application layer and not part of any container.
-
Why SASS based theme? Magento 2’s default LESS based theme is just working fine?
I will not go into much details here. Both these preprocessors have their own pros and cons. And all of you frontend developers, definitely mastered these controversial points around SASS and LESS. I found an informative article here and leave you to it. On Magento 1, we build clients projects based on SASS and I personally found SASS is more structured(prettier) and faster.
Alrighty, Time to get our project setup.
Overview
To keep this article as an easy-to-follow read, I will use my own project’s directory structure. But, you are free to modify this structure as you please. Download and install Docker for Mac. Once installed fire docker up on your host machine. A tiny docker icon will appear on menu bar. Tap on the docker icon and select Preferences > Advanced. Allocate a minimum of 4GB RAM for your docker machine. To give more clarity, the containers which will be created are:
- PHP 7.1 + Apache2
- Node 8.9.4
- Redis
- MYSQL server (installed on host machine, on Macbook.)
Pre-requisite
Before you begin, head up to GitHub to Snowdog’s SASS based theme for Magento 2 and to their frontools. Read the installation instructions for both of these. Take a backup of your existing Magento 2 project and get these installed in one of your Magento 2 projects. Once installed, log in to backend and configure Snowdog’s SASS based theme for your website(s) as you please. Make sure you are able to see store-front with SASS based theme without any errors.
Do not ignore this step!
Docker Project Setup
Step 1: Create project root directory ~/magento2_docker/frontend/ and change to the frontend directory.
Step 2: Now do:
git clone -b community-master-1.0 git@github.com:asrar7787/docker-magento-2-sass.git .
Now being inside frontend directory, create directories src/htdocs. Copy your existing Magento 2 project, which now has Snowdog’s SASS based theme and frontools installed, inside of src/htdocs directory. And in app/etc/env.php file, change your database host to:
'docker.for.mac.internal'
This will ensure our docker project will talk to our MYSQL server which has been installed on host machine.
And if you are using redis, the host for redis would be redis.
You need to change the following IP to your local machine’s IP inside config/custom-xdebug.ini to get your xdebug work:
xdebug.remote_host=192.168.1.69
And also update the IP inside docker-compose.yml:
environment:
      XDEBUG_CONFIG: "remote_host=192.168.1.69"
You can get your local machine’s (host’s) IP by typing in terminal:
ifconfig
Now, the folders structures should look like below:
├── src
│   └── htdocs
│   ├── CHANGELOG.md
│   ├── CONTRIBUTING.md
│   ├── COPYING.txt
│   ├── app
│   ├── bin
│   ├── composer.json
│   ├── composer.lock
│   ├── Gruntfile.js.sample
│   ├── ISSUE_TEMPLATE.md
│   ├── dev
│   ├── index.php
│   ├── LICENSE.txt
│   ├── LICENSE_AFL.txt
│   ├── lib
│   ├── nginx.conf.sample
│   ├── package.json.sample
│   ├── php.ini.sample
│   ├── php_info.php
│   ├── phpserver
│   ├── pub
│   ├── setup
│   ├── update
│   ├── var
│   └── vendor
├── Dockerfile
├── config
│   ├── php.ini
│   ├── custom-xdebug.ini
│   └── magento.conf
├── docker-compose.yml
└── node
 └── Dockerfile
Step 3: Time to run some docker commands. Firstly, we will ask docker to build/fetch our docker images. And we will do so by running:
docker-compose up -d --build
What this command does is, going through the docker-compose.yml and start each service i.e. web, redis, node. This will take a bit time to complete. Once all images are successfully built, confirmation message will appear for corresponding image, like below:
Creating frontend_node_1 ... done
Creating frontend_web_1 ... done
Creating frontend_redis_1 ... done
Step 4: To check that images are successfully built and corresponding containers are successfully created, do:
docker ps -a
And it will show all available images and corresponding containers:

Docker: List all images and associated containers
As of now, we have our frontend_web and redis containers up and running, check the Status column. But the node:8.9.4 container exited. But this should not pose any issue.
N.B. Sometimes later, you might want to build your own docker images. And if the image status shows Exited (0), after running docker-compose up -d --build, this does not necessarily mean build process was not successful. Most of the time, this happens when the Dockerfile of an image does not have a CMD instruction and an associated command. The CMD instruction runs each time when a container fires up.
In this context, the node container’s Dockerfile, which is under node/Dockerfile, also does not have CMD instruction to run a command each time this container fires up. I will describe this later in Step 5 TLDR ?.
Step 5: Now, it’s time to create a new(detached) node container from our already built image node:8.9.4. Type in terminal:
docker run -it -d -v "$PWD/src/htdocs/vendor/snowdog/frontools/":/var/www/html/vendor/snowdog/frontools/ -v "$PWD/src/htdocs/vendor/snowdog/theme-blank-sass/":/var/www/html/vendor/snowdog/theme-blank-sass/ -v "$PWD/src/htdocs/pub/static/frontend/":/var/www/html/pub/static/frontend node:8.9.4 bash
?, it might be looking intimidating at a first glance. Let’s break this down ?.
By running
docker run -it -d
We are telling hey docker, I want you to fire up(run) a container in detached(-d) mode with input and terminal output(-it). The detached mode will create a new container for us.
Then, we used
-v "$PWD/src/htdocs/vendor/snowdog/frontools/":/var/www/html/vendor/snowdog/frontools/ -v "$PWD/src/htdocs/vendor/snowdog/theme-blank-sass/":/var/www/html/vendor/snowdog/theme-blank-sass/ -v "$PWD/src/htdocs/pub/static/frontend/":/var/www/html/pub/static/frontend
We are saying, hey docker, when you fire up this container, you map my host machines directory ($PWD/src/htdocs/vendor/snowdog/frontools) to a path inside the container (/var/www/html/vendor/snowdog/frontools). And, we are also asking docker to map $PWD/src/htdocs/vendor/snowdog/theme-blank-sass and $PWD/src/htdocs/pub/static/frontend directories from our host machine to corresponding directories inside our will-be created container.
This kind of mapping is known in docker world as, host directory bind mount.
After this, we just told docker to use our node image node:8.9.4 and suffixed with bash. Simply put, this bash will gives us a shell interface for our container, we will see this in Step 6.
TLDR -- In docker, when we fire up a container from an image, we can override existing or append new commands. It all depends how we initially build an image using a Dockerfile. In a nutshell, if we used ENTRYPOINT instruction with an associated command inside our node/Dockerfile, this bash command would then be appended after the ENTRYPOINT command mentioned inside the node/Dockerfile. And if we used CMD instruction with an associated command inside our node/Dockerfile, this bash command would then override that CMD command mentioned inside the node/Dockerfile. Generally, as per container ideology is concerned, each Dockerfile should finish with a command.
Step 6: Let’s do
docker ps -a
And we will see our newly created container gets appended at the top of the container’s list:

Docker: List all images and associated containers
Take a note of the newly created container’s ID, in my case, it’s b2d690addd87, yours will be completely different. We can still see our original node:8.9.4 container at the bottom. We keep this as it is, as a backup image. If, for any reasons, we loose our newly created container, we can fire up another detached container from this one, like we did in Step 5.
Step 7: At this point, we are all good to run npm, gulp related commands inside our newly created node container. Let’s do:
docker exec -it b2d690addd87 bash
Here, we are telling docker to execute the command(bash) inside our newly created container id b2d690addd87. And, here we go! We are inside our container now. And precisely in/var/www/html/vendor/snowdog/frontools.
In vagrant, this is something like doing -- vagrant ssh. One thing to note down, to have shell access, your image needs to be built with bash command.
Now, if you do ls -al in terminal, being in /var/www/html/vendor/snowdog/frontools, you’d see all the files/folders from your host machine. As you copied over your existing Magento 2 project with Snowdog’s SASS based theme and frontools under src/htdocs directory and you made sure that project was working fine (see Pre-requisite section), you might be having node_modules directory already. In this case, you can either remove this node_modules directory and do a fresh installation of all the node modules mentioned in package.json file. Or, just keep the existing node_modules directory and start using gulp. If you prefer to go for the former option, type in:
npm install
Once completed, install gulp globally. Type in:
npm install gulp -g
To verify gulp has been installed, type in:
gulp -v
You will be able to see the CLI and LOCAL versions.
Step 8: Now, it’s the time to run gulp tasks to compile our SASS files, which are inside /var/www/html/vendor/snowdog/theme-blank-sass/styles directory, and put them into pub/static/frontend directory. You can delete existing pub/static/frontend directory form your project root. This is to ensure that, the next command will actually compile stylings and JS and put them inside pub/static/frontend directory. Remember all happening inside /var/www/html/vendor/snowdog/frontools directory. Type in:
gulp styles
And if your configurations in /var/www/html/vendor/snowdog/frontools/config/themes.json file are correct, you should be able to see the compiled success messages appeared:
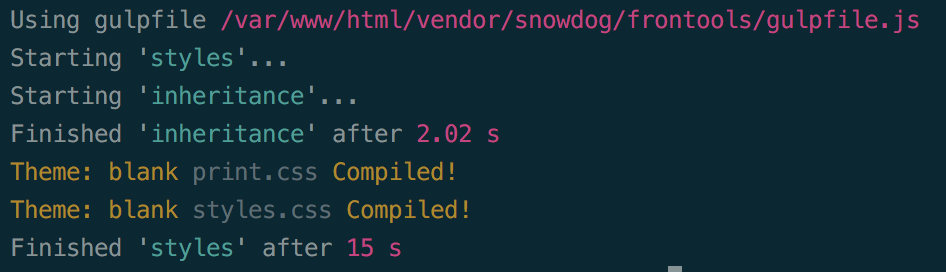
Gulp: Compiled messages
Now check in pub/static/frontend directory and you will see the static contents have been generated. To come out of this container, just type:
exit
When you want to stop these docker containers, you can just type, being in ~/magento2_docker/frontend/:
docker-compose stop; docker stop b2d690addd87;
And, to start:
docker-compose start; docker start b2d690addd87;
Remember, your container ID will be completely different than mine (b2d690addd87).
Everyday usage
Now, as long as you keep these containers as is, and didn’t try the following 😉 (if you do so, you need to start from Step 3):
docker-compose down
And updated your stylings in sass files and want to run gulp, all you need to is to
- Get inside the newly created node container, remember, your container ID will be completely different than mine (b2d690addd87):
docker exec -it b2d690addd87 bash
- Being inside /var/www/html/vendor/snowdog/frontools directory, type:
gulp styles
That’s all!
Any feedbacks/comments/suggestions? Most welcome on my twitter.